Monday, January 25, 2016


Sphagnum Peat Moss - Is It Just a Memory?


We are becoming really close to losing one of the gardeners most valuable natural resources. 


Many of you might be thinking that if you don’t use sphagnum, this doesn't affect you. But if you are a gardener, you are affected whether you know it or not. Sphagnum peat moss is a main ingredient in most soilless mixes that gardeners use.

I was the greenhouse chairman for our Master Gardener group for a number of years and was responsible for purchasing all of the supplies needed to begin our planting process each spring. Year after year, I noticed the cost of seed starting, as well as soilless mix, was increasing by a few dollars each year. Suddenly the prices rose dramatically. I began doing a little research and was shocked when I discovered the reason for the rising costs.

Canadian Sphagnum Peat Moss (CSPM) is not in itself a soil nutrient. However it is very porous, which results in it holding nutrients as well as moisture. This makes it valuable in the production of potting mixes.

It is formed by nature over centuries, through the decomposition of vegetative matter in wetlands that contain poorly drained, oxygen-deprived soils. In these types of conditions, decomposition is somewhat slower than we are normally accustomed to. Most of the sites that are favorable for producing CPSM in North America are located across northern Canada.

This is a very slow process; the rate of accumulation is less than 1/8 of an inch annually. A depth of 6 inches of peat is considered a jackpot. As you can guess, the rate of harvest greatly exceeds the rate of accumulation.

Peat was used as a fuel by native Canadians as well as Americans for hundreds of years. What has taken Mother Nature thousands of years to produce has been depleted by man in a fraction of that time.

What are gardeners supposed to do? There are several alternatives that seem to work quite well.

Leaf Mold
In the United Kingdom, leaf mold is the soil connoisseur’s choice for amending poor soils as well as a very effective mulch. It is simply shredded leaves that have been kept damp until fungi begin to break them down. Most leaves are on the acidic side when dry. When they begin to decay, they move to a more neutral pH making them ideal as an amendment to your soil. Leaf mold is great at holding moisture as well as making the soil more friable. The best part is the cost: leaves are free and all you need to do is shred them with the lawnmower, keep them damp in a shady location and let nature take its course.

Coir
This is the shredded fibrous husk of a coconut. It holds moisture very well and drains well also. Being a natural substance it breaks down and adds nutrients to the soil, and it is a plentiful, renewable resource. It is also high in potassium. On the down side it is acidic; if you use it on vegetables or other alkaline loving plants you need to monitor the soil pH. Lime can be added to raise the pH if warranted. It is also a little on the costly side as it is not produced in North America, which can add to the transportation costs.

PittMoss
A new kid on the block was noticed noticed after the creators made their appearance on the TV show Shark Tank. PittMoss is a mix of proprietary additives and recycled paper. The producers say that it is comparable in cost to peat moss with a zero impact on the environment. During trials, plants grown in PittMoss require 50% less water than plants grown with peat moss. At the present time this product is only available to commercial growers. A manufacturing plant is being built in order to increase production and make the product available to the general public. For a short six minute video on PittMoss click here
Whether you use peat moss in your garden beds, or as an ingredient in your own soilless mixes for seed starting or containers, I hope you will give some of these alternatives to CSPM a try. By switching to an alternative, you will help to conserve a valuable natural resource and slow the rate of depletion in Canada's natural peat bogs.


Dave's Garden Sphagnum Peat Moss Info


Monday, October 19, 2015

Amaryllis Adventure: Colorful Surprises Grown from Seed


Amaryllis Adventure: Colorful Surprises Grown from Seed

Amaryllis! Those huge bulbs that explode upward into enormous blooms bring magic to dreary winter days. Growing them from strange papery seeds can be even more of an adventure

I got five Amaryllis (Hippeastrum) seeds as bonus in one of my first DG trades and dashed to PlantFiles to see what I should do with them. I read that it's best to sow the seeds when they're fresh, so I grabbed a little clay pot and planted them right away. Seeing 5 slender, grass-like leaves emerge was such fun! Then I read that it could be years before I'd see a bloom. Ah, well. I tucked the pot away at the back of my plant stand. As the seedlings grew, I separated them into bigger pots. Then, one winter, I got a bloom! (Photo at upper right is my first seed-grown bloom.) I was hooke5 grass like seedlings in small clay potd. I had to try again this year, starting in winter with seeds from my own plants.

Let's have a moment of blunt honesty: it can take 3 to 5 years for an amaryllis seedling to get big enough to bloom. Why would anybody bother? It's quicker to grow out offset bulbs and quicker yet to just buy a fat new bulb. There's a certain thrill in creating a new plant, in not quite knowing what you're going to get when you hybridize your own. Sometimes, it's another way to propagate a hard-to-find favorite. Self-pollinated seeds won't come true to the parent plant, but some will likely be close.

If you have two pretties blooming at the same time, cross-pollination is easy. To reduce the chance of a flower also self-pollinating, use a newly-opened bloom. close up of anthers showing fuzzy gold pollenCarefully clip the anthers (the things shaped like great big grains of rice, where the pollen will emerge) from the bloom, so their pollen won't get on the stamen. shows wedge shaped tip of pale green stamenJust toss them out, or save them to pollinate another plant. Now pick an anther with fluffy golden pollen from another plant that you want to cross with your parent bloom. You can also use a little brush or q-tip to transfer pollen from one plant to another. Dab the pollen generously onto the stamen (the female structure, a slender projection ending in a tri-lobed stub). 


If the ones you want to cross don't cooperate by blooming at the same time, don't worry. You can save pollen in the refrigerator for a few days or in the freezer almost indefinitely. I found some little plastic containers at the dollar store that are perfect for holding a few pollen-laden anthers, freshly snipped from a bloom. pale pink amaryllis bloom

Often, seed pods will form without any help from you. Most likely, they are self-pollinated. You can deliberately make a self-pollinated cross, of course, by dabbing the flower's stamen with pollen from the same bloom. Why would you want to cross a bloom with itself? Re-mixing the combination of genes that produced a hybrid can give you completely new results, hopefully with some of the same desirable charactistics of the parent. One of my favorite amaryllises this winter was a mis-labeled variety that we've been unable to ID. I'm hoping its self-pollinated offspring will have the same light fragrance (unusual for an amaryllis) as its delicately shell-pink parent.


oval green swellings at base of blooms
You'll know pollination was successful when you see a swelling at the base of the bloom. brown dry seed pod splits to show stack of papery black seedsAfter the flower fades, the ovary will continue to swell to an inch or more in diameter. Be patient; it can take several weeks for the seeds to mature. You'll know when they're ready, because the pod will split open to reveal flat, black, papery seeds. If you rub the papery ovals between your fingertips, you'll be able to feel the tiny bumps that are the actual seeds.

black flat papery seeds scattered on counter pair of black seeds tucked down into potting mix shows corner of domed venter container 

 I start amaryllis seeds the same way I start most seeds indoors, by pressing them into moist sterilized potting mix in a vented, domed seed starting tray grasslike sproute in round container with yellow straw laid across diagonally(aka "take out salad container with holes punched in top and bottom"). Since Hippeastrums are tropical, I put them on a seedling heat mat to help with germination. Every seed sprouted! After a couple of months, it was time to pot them up individually. At this stage, most of them still look like single blades of grass, although a couple were starting to put up a second leaf. When I gently lifted each seedling for planting, I saw tiny bulbs forming! They looked more like chives than amaryllises, but I knew with time the bulbs would get bigger and acquire their dark papery skin.

tiny white bulbette and grassy leaves plastic cup containing 5 seedlings like blades of grass seedlings have sprouted more grassy foliage 

They'll grow on under the lights this year, and I'll transplant them into larger containers as they grow. To save space, I'll likely pot them in clumps. By next year, they may be big enough to spend the summer planted out in the tropical bed by my deck.
I can't wait to see them bloom!

For more information on growing and propagating Hippeastrum, please visit the DG Amaryllis and Hippeastrum forum.

For amaryllis sources, check out the bulb suppliers listed in the Garden Watchdog.

Photos by Jill M. Nicolaus. Move your mouse over images and links for more information (let the cursor hover for a couple of seconds, and a pop-up caption will appear).


Tuesday, August 11, 2015

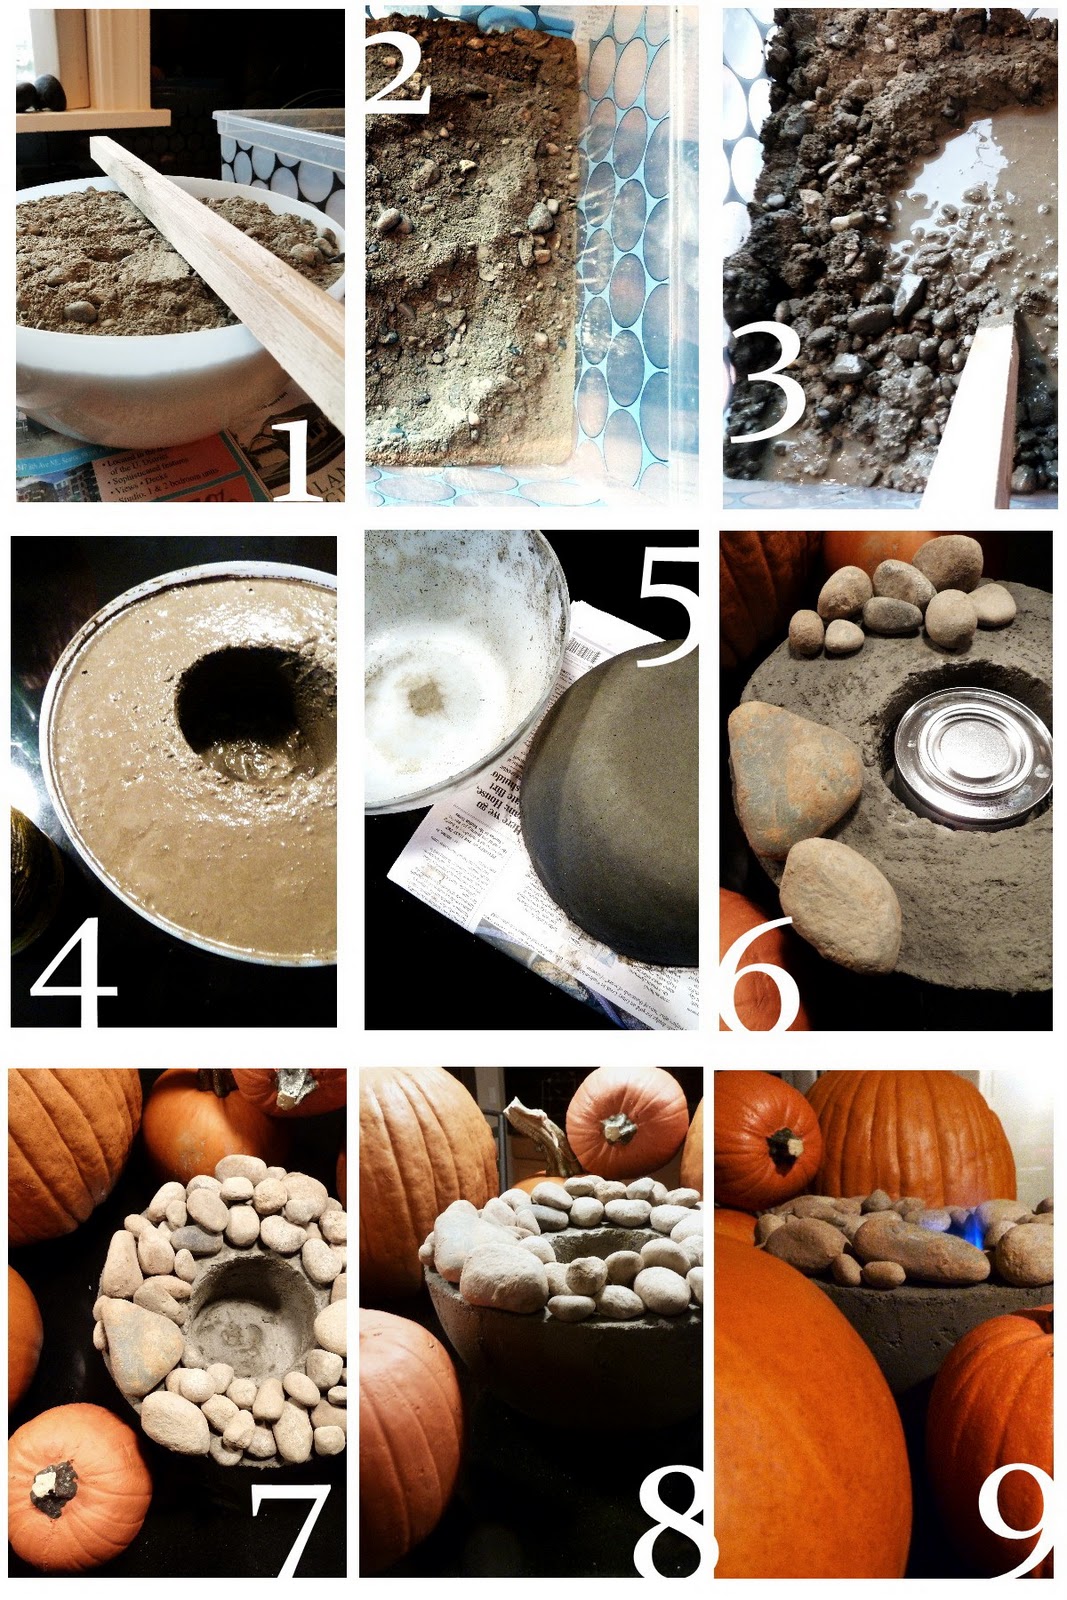
Gas Fire Pit


Project 1: Rock + Bowl + Flame ( 31 DIY Projects for Busy Gals)

31 minute project

You'll need:

Sakrete Quickset Concrete
a bunch of rocks (perhaps dug up from your yard)
a plastic bowl
a large canned good
chafing dish gel fuel pack
PAM cooking spray
newspaper
plastic tub for mixing concrete
stick to stir concrete

You are going to create one of these
(which, FYI, Restoration Hardware doesn't sale anymore,
hence why we are making our own)


In pictures:


For the readers:
1. Measure out your concrete. I just filled my plastic bowl/mold with dry mix.
2. Dump mix in plastic mixing bin.

3. Add water; stir with stick.
Start with a puddle in the middle of dry mix.  Not too soupy, not too chunky
3b. Spray PAM all over your mold and canned good.

4. Pour concrete into mold.
4b. I poured halfway, then placed my large canned good in the center and continued filling around the can.
4c. After about 6 minutes, I rotated my can, wiggled side to side and popped it out.
PAM is awesome.

5. At the 17 minute mark, Cover top of mold with stack of newspaper.
Flip it over carefully; concrete form will slip right out.
Because...well, PAM is awesome.

6. and 7. Carefully and pleasingly place loose rocks along rim of concrete form.
8. and 9. Drop fire gel pack in center hole; light with long match and enjoy.


ROCK BOWL FLAME


Outdoor Oven


Monday, July 9, 2012

Portable Pizza Oven

I've been wanting to make a wood fired pizza oven for a while, but haven't had the space to put it. Then I came across this "portable" design (GardenFork.tv) that can be taken down and put away or (relatively) easily relocated when needed.


The original design comes from the book Bread, Earth, & Fire by Stuart Silverstein. The author recommends making an insulated base with a mix of 6 parts perlite, 1 part Portland cement, and enough water to make a rough batter. It took 2-1/2 bags of perlite (2 yards each) to get a 2-1/2 inch base of the cement mix. The base weighs more than I thought it would, but it's still much lighter than straight concrete; about 100 lbs. Two people can easily carry it. It's also fairly brittle and "chalky," so care needs to be taken when laying the bricks.


There was a bit of a learning curve to figuring out how hot to get the fire and how to turn the pizza. But once I figured out that I need to just make it really freaking hot, the pizza cooks pretty fast. Less than 5 minutes total. This works out really well when there's a large crowd to feed. You can cook a pizza in the same time it takes to assemble the toppings. So one person can be building their pizza while one is cooking. No backlog of pizzas waiting to go in.

As for portability, well...you just take it apart and reassemble it somewhere else. Everything is dry stacked. No mortar. I plan to take this on a campout in a few weeks, so we'll see how well that goes...


Outdoor Oven


Monday, July 20, 2015

Glass Bottle Star Shape In Garden


My bottle 'sun' or 'star', depending on what time of day it is...zone 4 garden, no breakage problems, buried in sand. Recycled wine, beer, and liquor bottles:)
Time: 2 Hours Difficulty: Easy
Bottle 'sun' in my gazebo in the center of my veggie garden. Zone 4, no breakage...has been buried for a couple of years. Old grind stone in the center.
First I chose the spot in the center of the new garden. I laid out the 'point', then dug the bottle in upside down...whole. I had an old grindstone that I used for the center. I used a post hole digger, shovel, and rubber mallet.
The bottles all buried...you can easily make adjustments in the sandy soil. I used a 2" by 4" and a level to get the bottles aligned to the same height.
I filled with sand to bring the ground level up to where I wanted it...just and inch or so from the top of the bottles.
I spread pea gravel on top to finish the sun off.
This summer I added a 'door mat'!
Here is the final view. The bottle sun is under the pergola (which has been taken over by hops!)


Sunday, June 14, 2015

Identifying Weeds


Help in Identifying Weeds


Thanks to this post by John Riha I can now officially identify that the "clover" weed found in my garden is in fact Wood Sorrel aka sour grass.


False Dandelion | Common Weeds

False Dandelion
AKA: flatweed, catsear
Latin: Hypochaeris
Description: Similar to good-old dandelions, the false dandelion changes up the color scheme, with white petals and yellow center. Both have parachute-type seeds and stubborn taproots, and the greens are edible (but bitter).
Get rid of it naturally: Dig it out with a garden fork (be sure to sever the root).
Chemical attack: Use a pre-emergent herbicide


Purslane | Common Weeds


Purslane
AKA: rose moss, wild portulaca
Latin: Portulaca oleracea
Description: A low-growing, drought-tolerant weed that forms dense mats. It flourishes in very warm soil, and shows up in late June — making preemergent herbicides useless. This edible weed has more beta-carotene than spinach.
Get rid of it naturally: Don’t let it go to seed; mulch to suppress; pull by hand.
Chemical attack: Use a post-emergent broadleaf herbicide June through September.


Nutsedge | Common Weeds


Nutsedge
AKA: nutgrass
Latin: Cyperus rotundus
Description: One of the most invasive weeds in the world, nutsedge grows from underground tubers, so getting rid of it is a pain. Pulling the stalk doesn’t remove the tubers, which also evade herbicides. The thin stalks grow right through landscaping cloth.
Get rid of it naturally: Dig it up, removing all the tubers; drench areas with ½ cup molasses in 1 gallon water.
Chemical attack: Look for herbicides that target nutsedge.


Chickweed | Common Weeds


Chickweed
AKA: mouse ears, star weed
Latin: Stellaria
Description: A low-growing weed that likes moist and shaded conditions, such as the bed of ivy shown here. In lawns, it forms dense mats with small, symmetrically placed leaves on stringy stems. It’s sometimes picked as a salad green or topical salve for skin irritations, but pregnant and nursing women should avoid it.
Get rid of it naturally: Pull it by hand or dig up the shallow roots.
Chemical attack: Use a post-emergent broadleaf herbicide.


Spurge | Common Weeds


Spurge
AKA: spotted spurge
Latin: Euphorbia
Description: Spurge is a low-growing annual weed that forms a dense mat. It often roots in tiny cracks in sidewalks and driveways.
Get rid of it naturally: Pick it as soon as it appears to prevent it from going to seed.
Chemical attack: Apply a preemergent herbicide in late winter; use a post-emergent herbicide during growing season (2,4-D won’t work on mature plants).


Buckthorn Plantain | Common Weeds


Buckhorn plantain
AKA: narrow-leaf plantain, chimney-sweeps, ribgrass
Latin: Plantago
Description: A big, vigorous weed that forms dense clumps and takes over whole portions of lawn.
Get rid of it naturally: Pick it and eat it before it forms seed stalks. WebMD cautions that pregnant and breast-feeding women should avoid plantain.
Chemical attack: Use an isoxaben-based, preemergent herbicide


Cleavers | Common Weeds


Cleavers
AKA: sticky-willy, catchweed, bedstraw, goosegrass
Latin: Galium aparine
Description: This fast-growing weed can be invasive. The stems and leaves have little hooked bristles so it can attach itself to fencing, posts, and other growing plants. The sticky seeds catch on animal fur.
Get rid of it naturally: Pull it (wear gloves), but be careful not to tear out whatever plant it’s attached itself to.
Chemical attack: Use a general post-emergent herbicide.


Wood Sorrel | Common Weeds


Wood sorrel
AKA: shamrock, sour grass
Latin: Oxalis
Description: Despite its sweet, clover-like appearance, the wood sorrel is a persistent weed that finds its way into flower boxes, containers, and beds.
Get rid of it naturally: Hand-pick from planters; use proper lawn care to crowd out sorrel.
Chemical attack: Apply a preemergent herbicide in spring; spot treat with a post-emergent broadleaf herbicide.


Thyme Leafed Speedwell | Common Weeds


Thyme-Leafed Speedwell
AKA: shares its “speedwell” name with a garden perennial — Veronica alpina — and other speedwells
Latin: Veronica serpyllifolia
Description: With its thumbtack-size flowers, thyme-leafed speedwell is one of the prettiest weeds. It likes to invade damp, acidic soils, and spreads freely.
Get rid of it naturally: It’s easily pulled, but get it out before it goes to seed.
Chemical attack: Use a post-emergent herbicide


Prickly Lettuce | Common Weeds


Bull Thistle
AKA: Scottish thistle
Latin: Cirsium vulgare
Description: Left alone, bull thistle will grow 3-4 feet tall topped with a bright magenta flower. In your lawn, regular mowing only makes this bristly, spine-covered plant spread out.
Get rid of it naturally: Dig it out with a shovel, taking 2-3 inches of soil.
Chemical attack: Use a selective broadleaf herbicide that targets bull thistle


Killing Weeds Naturally


7 Ways to Kill Weeds Naturally


Want to avoid chemicals to kill weeds? Here are 7 ways to stop weeds with weapons you already have around your house.

Difficulty: Easy


1. Newspaper. A carpet of newspaper, which blocks sunlight and oxygen from reaching the soil, will smother weeds and prevent new ones. Spread newspaper in 10-sheet layers, wet the sheets to help hold them down, and cover with an inch or two of mulch. If weeds begin to grow in the mulch, add more layers, making a mulch-newspaper lasagna, which eventually will decompose and nourish the soil. 

2. Old shower curtains and carpet samples. Spread in garden paths or between rows. Cover with mulch. 

3. Corn gluten meal. This corn by-product stops seeds from growing into weeds. Since the meal prevents germination, use it around established plants and after seedlings and transplants have taken hold. After harvest, spread the meal to prevent late-season weeds. 

4. Vinegar. The acetic acid in 5% vinegar sucks the life out of plant leaves. It’s most destructive to young plants with immature roots, though it just rolls off weeds with waxy leaves, like pennywort or thistle. You might need a stronger vinegar solution (20%) for tough weeds. 

Cover your other plants when spraying with vinegar so it doesn’t kill them too. Keep your spray on target by removing the bottom from a 2-liter plastic soda bottle and placing it over the weed. Then spray vinegar into the mouth of the bottle so there’s no splatter.
 
5. Vodka. We don’t know if vodka makes weeds fall down dead or drunk, but 1 ounce mixed with 2 cups of water and a couple of drops of dish soap will dry out weeds that live in the sun. Doesn’t work that well on shade-loving weeds. Protect your good plants, because vodka will dry them out, too.
 
6. Soap. The oil in soap can break down waxy or hairy weed surfaces, making them vulnerable to desiccants like vinegar. So add a few drops of liquid dish detergent to vinegar or vodka sprays to help the leaves hold the solution. The soap also makes leaves shiny, helping you keep track of what you’ve sprayed.
 
7. Boiling water. After you’ve made yourself a cup of tea, take the kettle outside and pour the boiling water on weeds to scale and kill them. But don’t burn yourself! This is a good way to whack driveway and walkway weeds, because the boiling water runs off impervious surfaces and cools before it reaches border plants. It might take several treatments for weeds with long roots, like dandelions. And if you have a lot of weeds, this might be more legwork than it’s worth.
 

You can check out our original post here: http://goo.gl/5lOY27
http://www.hometalk.com/8839100/7-ways-to-kill-weeds-naturally?se=wkly-20150614&utm_medium=email&utm_source=wkly&date=20150614